
브래의 슬기로운 코딩 생활
Xcode 사용법 - 2 (BMI 판정 앱) 본문
BMI 계산
https://www.onlinegdb.com/online_swift_compiler
https://replit.com/languages/swift
let weight = 60.0
let height = 170.0
let bmi = weight / (height*height*0.0001) // kg/m*m
print(bmi)
BMI 계산 결과 판정
let weight = 60.0
let height = 170.0
let bmi = weight / (height*height*0.0001) // kg/m*m
var body = ""
if bmi >= 40 {
body = "3단계 비만"
} else if bmi >= 30 && bmi < 40 {
body = "2단계 비만"
} else if bmi >= 25 && bmi < 30 {
body = "1단계 비만"
} else if bmi >= 18.5 && bmi < 25{
body = "정상"
} else {
body = "저체중"
}
print("BMI: \(bmi), 판정: \(body)")
Swift 문자열 서식(swift string format 자리수)
import Foundation
let weight = 60.0
let height = 170.0
let bmi = weight / (height*height*0.0001) // kg/m*m
let shortenedBmi = String(format: "%.1f", bmi)
var body = ""
if bmi >= 40 {
body = "3단계 비만"
} else if bmi >= 30 && bmi < 40 {
body = "2단계 비만"
} else if bmi >= 25 && bmi < 30 {
body = "1단계 비만"
} else if bmi >= 18.5 && bmi < 25{
body = "정상"
} else {
body = "저체중"
}
print("BMI: \(shortenedBmi), 판정: \(body)")
swift Foundation
https://developer.apple.com/library/archive/documentation/Cocoa/Conceptual/Strings/Articles/formatSpecifiers.html
https://developer.apple.com/documentation/swift/string
BMI를 판정하는 calcBMI()함수 정의
import Foundation
func calcBMI(weight : Double, height : Double) -> String{
let bmi = weight / (height*height*0.0001) // kg/m*m
let shortenedBmi = String(format: "%.1f", bmi)
var body = ""
if bmi >= 40{
body = "3단계 비만"
} else if bmi >= 30 && bmi < 40 {
body = "2단계 비만"
} else if bmi >= 25 && bmi < 30 {
body = "1단계 비만"
} else if bmi >= 18.5 && bmi < 25 {
body = "정상"
} else {
body = "저체중"
}
return "BMI:\(shortenedBmi), 판정:\(body)"
}
print(calcBMI(weight:62.5, height: 172.3))
if~else를 switch~case로
import Foundation
func calcBMI (weight : Double, height : Double) { //Void형
let bmi = weight / (height*height*0.0001) // kg/m*m
let shortenedBmi = String(format: "%.1f", bmi)
switch bmi {
case 0.0..<18.5:
print("BMI:\(shortenedBmi),판정:저체중")
case 18.5..<25.0 :
print("BMI:\(shortenedBmi),판정:정상")
case 25.0..<30.0 :
print("BMI:\(shortenedBmi),판정:1단계 비만")
case 30.0..<40.0 :
print("BMI:\(shortenedBmi),판정:2단계 비만")
default :
print("BMI:\(shortenedBmi),판정:3단계 비만")
}
}
calcBMI(weight:62.5, height: 172.3)
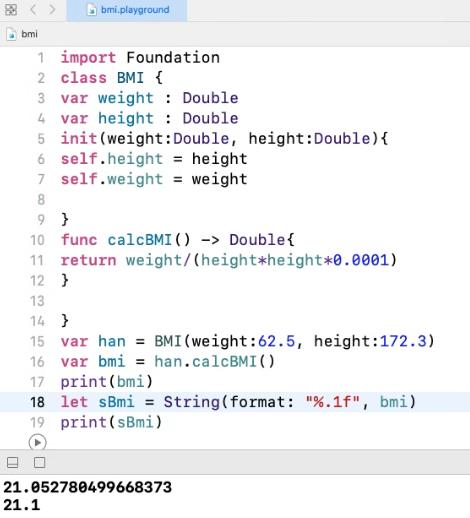
BMI 계산하는 클래스로 구현
import Foundation
class BMI {
var weight : Double
var height : Double
init(weight:Double, height:Double){
self.height = height
self.weight = weight
}
func calcBMI() -> Double{
return weight/(height*height*0.0001)
}
}
var han = BMI(weight:62.5, height:172.3)
print(han.calcBMI())
BMI 결과 판정하는 클래스 만들기
import Foundation
class BMI {
var weight : Double
var height : Double
init(weight:Double, height:Double){
self.height = height
self.weight = weight
}
func calcBMI() -> String {
let bmi=weight/(height*height*0.0001)// kg/m*m
let shortenedBmi = String(format: "%.1f", bmi)
var body = ""
if bmi >= 40{
body = "3단계 비만"
} else if bmi >= 30 && bmi < 40 {
body = "2단계 비만"
} else if bmi >= 25 && bmi < 30 {
body = "1단계 비만"
} else if bmi >= 18.5 && bmi < 25 {
body = "정상"
} else {
body = "저체중"
}
return "BMI:\(shortenedBmi), 판정:\(body)"
}
}
var han = BMI(weight:62.5, height:172.3)
print(han.calcBMI())
앱 개발 절차

IBOutlet과 IBAction 생성 및 확인

rounded button : identity inspector
버튼 선택한 후 Identity Inspector 클릭
User Defined Runtime Attributes에서 [+]클릭
Key Path : layer.cornerRadius, Type: Number, Value : 7 입력

Text Field의 keyboard Type : Decimal Pad


https://developer.apple.com/documentation/uikit/uitextfield
https://developer.apple.com/documentation/uikit/uikeyboardtype
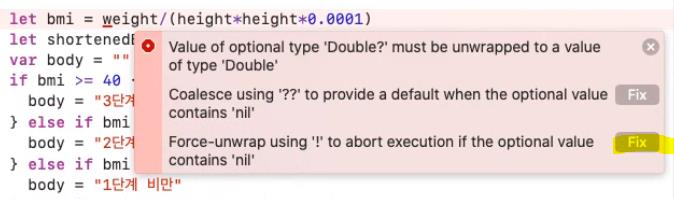
Xcode 자동 수정 제안 : Fix
Xcode 도움말 보기
print(Double("Hi"))
해당 단어에서 alt키 누름
물음표 나오면 클릭
+완성된 소스 (코드 정렬 : Control+i)

판정 결과에 따라 출력 레이블에 다른 배경색 지정


https://developer.apple.com/documentation/uikit/uicolor
Buide & Run

View의 Object 순서 변경
Object추가한 순서대로 위에 위치하므로 앞에 추가한 object를 가림
드래그하여 순서 변경
투명도는 Attributes inspector의 Alpha값 줄이면 점점 투명해짐


switch : UISwitch클래스
Action
switchOnOff(_ sender :UISwitch){
if sender.isOn {
//켜 있을 때
} else {
//꺼 있을 때
}
}


https://developer.apple.com/documentation/uikit/uiswitch
세그먼트 컨트롤 디자인

세그먼트 컨트롤의 인덱스


https://developer.apple.com/documentation/uikit/uisegmentedcontrol
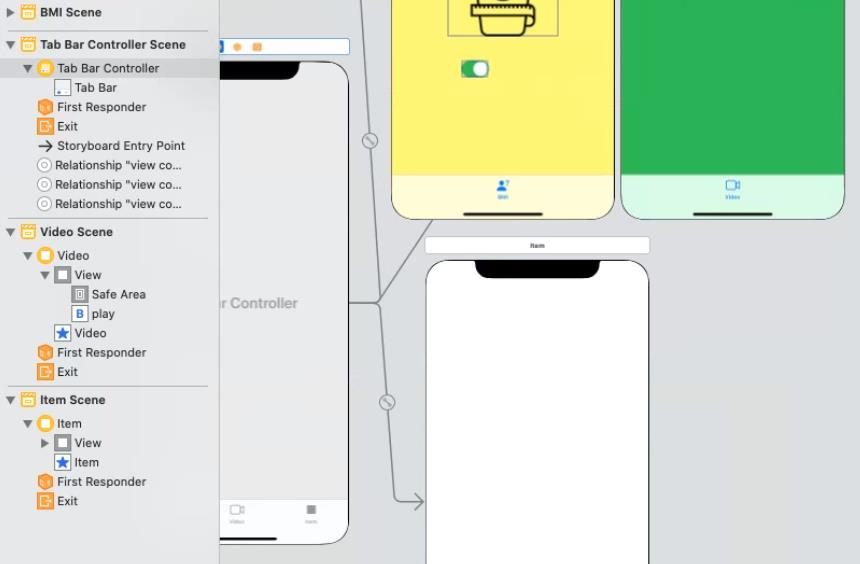
View를 여러 개로 만들고 싶어요 : Tab Bar Controller

Tab Bar Controller메뉴가 활성화 안됨?
[Editor]-[Embed In]


Tab Bar Controller가 앞에 붙음

Tab Bar item 이미지 변경

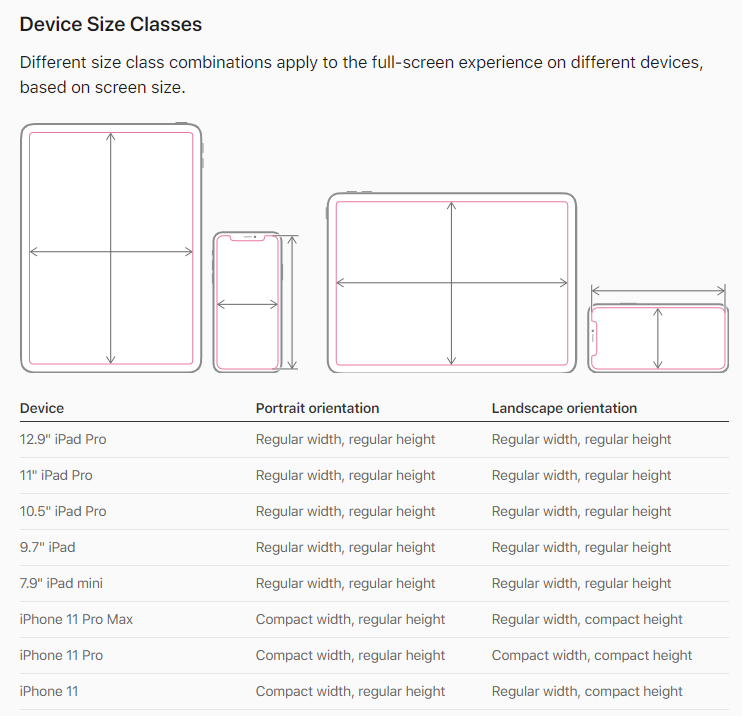
Custom Tab Bar Icon Size
https://developer.apple.com/design/human-interface-guidelines/ios/bars/tab-bars/
https://developer.apple.com/design/human-interface-guidelines/ios/visual-design/adaptivity-and-layout#device-size-classes

새로운 화면(View) 추가 : View Controller

캔버스 배치

새로 만든 View Controller를 Tab Bar Controller와 연결
Tab Bar Controller에서 새로 만든 View Controller로 Control키 누르면서 드래그
버튼을 떼면 나타나는 검은 창에서 [Relationship Segue]-[view controllers]선택

연결되면 Segue가 생김

새로 생긴 뷰컨트롤러의 Tab Bar item 이미지 변경

Build & Run


비디오 재생을 위한 소스코드(VideoViewController) 만들기


Cocoa Touch Class로 만들면 부모 지정 가능
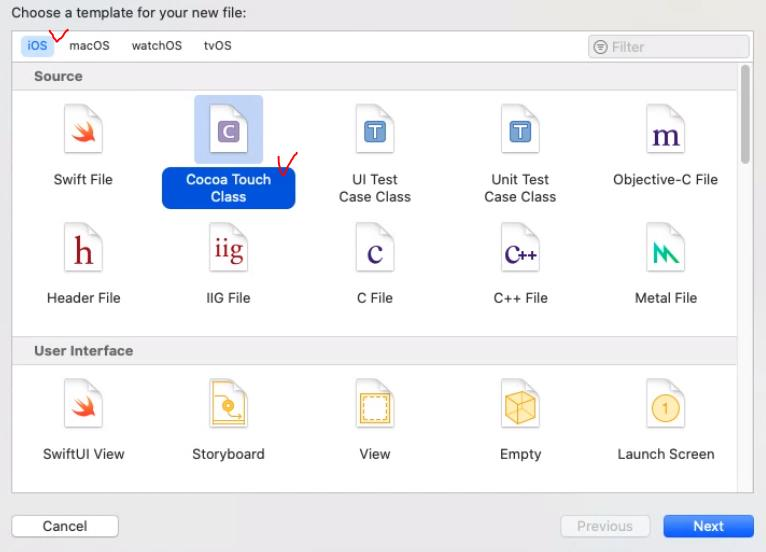
VideoViewController클래스 만들기

import AVKit

mp4파일 프로젝트에 복사
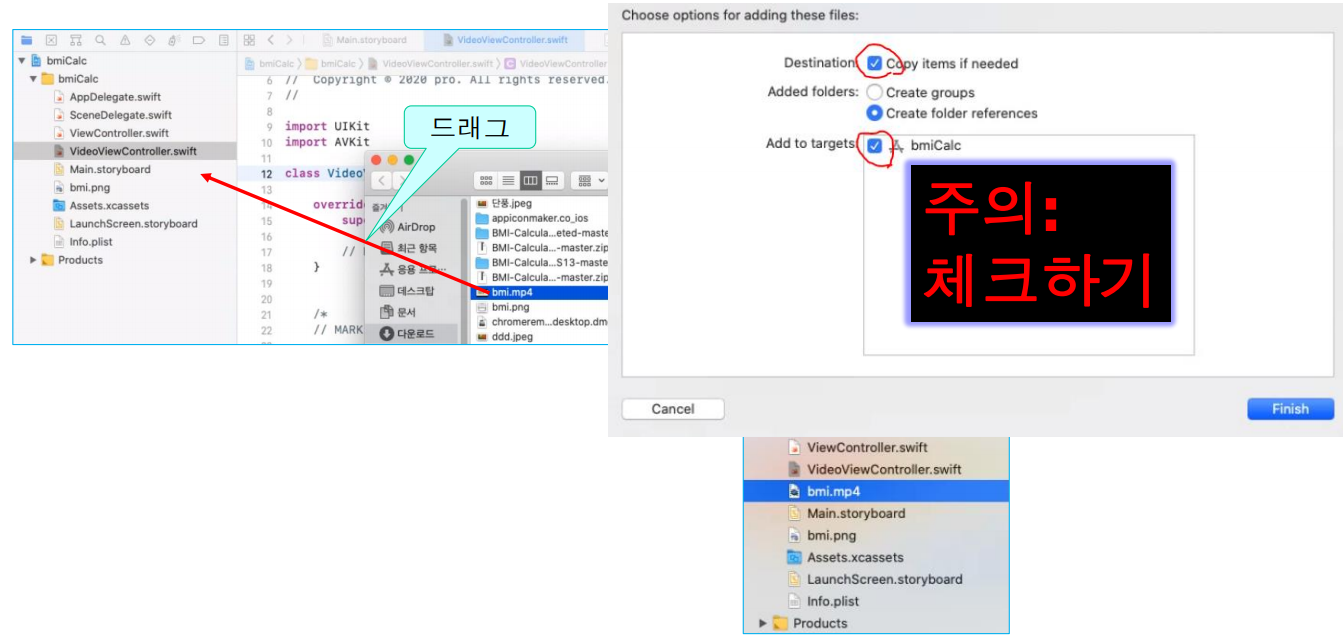
Video Scene 스토리보드와 VideoViewController클래스 연결

Video Scene에 비디오 재생할 버튼 추가

버튼에 Action추가 : 버튼을 누르면 동영상 재생
Assistant editor열기
- Main.storyboard선택하고 Ctrl+Command+Alt+Enter
주의: VideoViewController.swift가 열렸는지 확인하고 코딩

비디오 재생 소스 입력

실행 결과

다시 View Controller 추가

새로 추가한 View Controller를 Tab Bar Controller와 연결
Tab Bar Controller에서 새로 만든 View Controller로 Control키 누르면서 드래그
버튼을 떼면 나타나는 검은 창에서 [Relationship Segue]-[view controllers]선택

연결되면 Segue가 생김
새로 생긴 뷰컨트롤러의 Tab Bar item 이미지 변경

웹사이트 보여주는 소스코드(WebViewController) 만들기

Cocoa Touch Class로 만들면 부모 지정 가능

WebViewController클래스 만들기


Web Scene 스토리보드와 WebViewController클래스 연결

Web Scene에 버튼과 WebKit View 추가

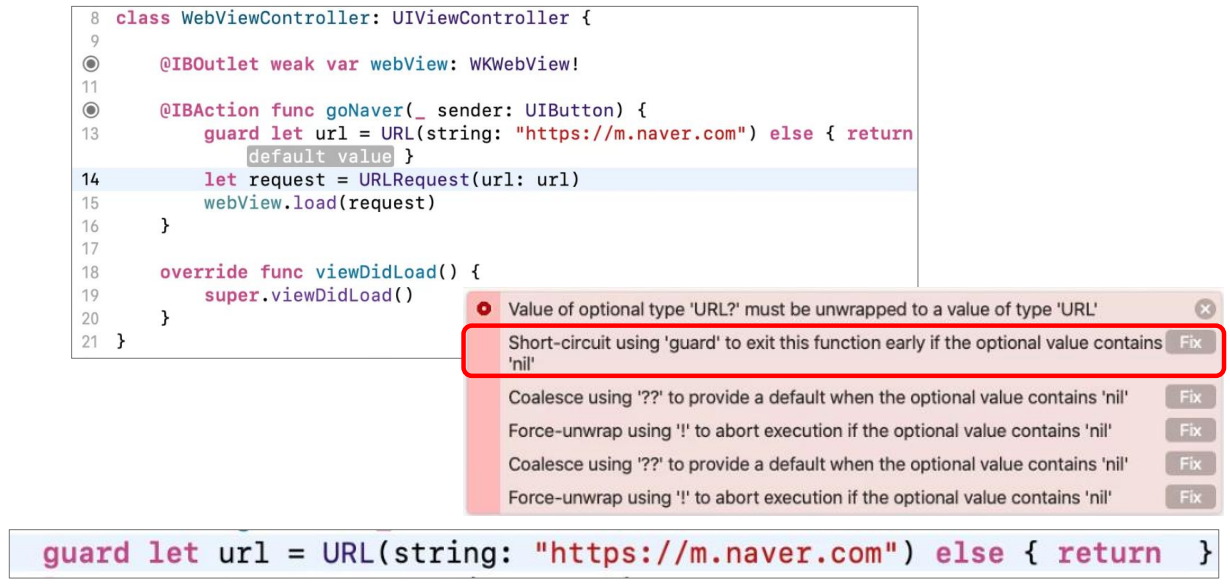
버튼에 Action추가 : goNaver
Assistant editor열기
- Main.storyboard선택하고 Ctrl+Command+Alt+Enter
주의: WebViewController.swift가 열렸는지 확인하고 코딩

WKWebView Outlet지정 : webView
내용이 URL에 따라 바뀌므로 변수(outlet)로 지정해야 함

웹사이트 출력 소스 입력
https://developer.apple.com/documentation/webkit/wkwebview

URLRequest 구조체
https://developer.apple.com/documentation/foundation/urlrequest

URL구조체
https://developer.apple.com/documentation/foundation/url


이 소스의 문제점 : url이 없으면?

guard문으로 fix
guard문(조건식이 거짓이면 실행)
guard문은 swift 2에 도입된 구문
guard문은 표현식이 거짓(false)으로 판단될 경우에 수행될 else 절을 반드시 포함해야 함
- else 절에 속한 코드는 현재의 코드 흐름을 빠져 나갈 수 있는 구문(return, break, continue, throw 구문)을 반드시 포함해야 함
- 또는 다른 함수를 else 코드 블록 안에서 호출할 수도 있음
guard <불리언 표현식> else {
// 표현식이 거짓일 경우에 실행될 코드
<코드 블록을 빠져 나갈 구문>
}
// 표현식이 참일 경우에 실행되는 코드는 이곳에 위치
guard문은 기본적으로 특정 조건에 맞지 않을 경우에 현재의 함수나 반복문에서 빠져 나갈 수 있도록 하는 ‘조기 출구(early exit)’ 전략을 제공
guard~let의 활용
guard는 return, break, continue, throw 등 제어문 전환 키워드를 쓸 수 있는 상황이라면 사용이 가능
그래서 함수 뿐 아니라 반복문 등 특정 블록 내부에 있으면 사용 가능
물론 함수 내부에 있다면 보통 return을 써서 해당 함수를 조기에 빠져나오는 조기 출구 용도로 사용
실제 앱을 만들다 보면 옵셔널 바인딩 때문에 다중 if~else를 사용해야 하는데, guard~let을 사용하면 다중 루프 없는 훨씬 가독성이 좋은 코드가 가능해서 그런 경우 많이 사용

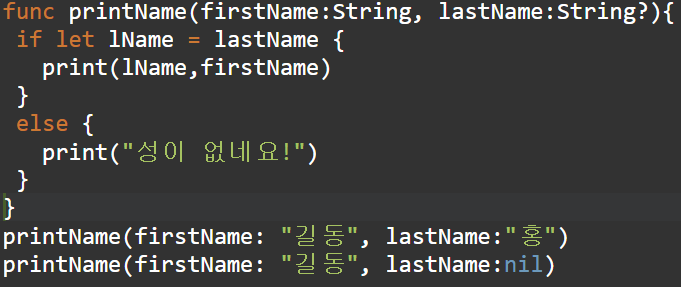
if~let vs. guard~let

특정 웹사이트 출력 소스

WebViewController.swift파일

guard let대신 if let으로 작성한 소스

실행 결과

앱의 가장 큰 문제점 : Autolayout


'Class > Swift' 카테고리의 다른 글
| iOS 화면 전환 방식 (0) | 2023.01.30 |
|---|---|
| Autolayout (0) | 2023.01.27 |
| Xcode 사용법 - 1 (2) | 2023.01.24 |
| extension, Swift 접근 제어 (access control, access modifier), 프로토콜(protocol)과 Delegate, 열거형 (enum) (0) | 2023.01.23 |
| 클래스 - 2, failable initializer, 클래스(class) 상속 (2) | 2023.01.20 |


